Monday, August 27, 2012

Rainbow Cakes and a Birthday


We celebrated somebody turning 1 over a week ago. I can't believe a year has already passed that our little Shelb's was born. For Cal J and Ry-pie's 1st birthday's we always kept it small, sticking with family and close friends. Since the fam is back in NM we just spent a low-key day with Josh, myself, and the kiddos. It was quite nice, actually. No party to worry about, no "theme" to think of. Just us. I did make her cupcakes, at least. Rainbow cupcakes! If you can use a box mix and add food coloring, you can make these treats! Check out the recipe here.


Even pretty without the frosting. 
A swirl of frosting to top it off. 


What a colorful mess!
Our happy girl, enjoying her gifts. 


Monday, August 13, 2012

Sister Dolls

Hi there! I feel like I've been away from here forever. I guess it has been quite awhile. I've been spending all my time with the kiddos, soaking up the sun, and enjoying summer. 

I've been wanting to share this for awhile now, and just finally made the time.

I bought the cutie on the left for Ry-pie, the year she was born. She's been pulled at, drooled on, and loved on a lot. I felt is was only right to get a similar doll for Shelb's. Sister dolls, if you will. 

I contacted Dianne again (who made the first one), from EMMI'S COTTAGE on Etsy, and she was willing to whip up little sister for us. She was wonderful! I was able to choose the hair, the expression, the dress. She came out so sweet...and we love her. 

Thanks Dianne! 


Sister Dolls 
Daydreaming
Playing


I sure hope Ry-pie and her sister are able to get along this well! :)

Tuesday, April 3, 2012

Jean re-fashion (part 2)

Ry-pie is turning 3 this summer, yet this little girl can still wear 18 month sizes. These size 18 months jeans fit her great in the waist, but are a little bit on the short side. Since the weather has been fantastic, I figured the easiest fix was to make them into capris.


I shortened her jeans by just rolling the hem up twice.

I hand-sewed a button to the outside cuff, making sure to secure the fold.

I tacked the opposite side of the cuff, so it wouldn't roll down at all.

And that was it! Easy capris to enjoy in this ridiculously beautiful weather!


I hope your weather has been great too!

Monday, April 2, 2012

Jean re-fashion

I've had these tiny little jeans hanging around for almost 6 years now. They re-surfaced as we were getting ready for the move. They were Cal J's and I just couldn't seem to let go of them. Shelb's has been wearing them, but I felt that I needed to "girlify" them, just a little...


So here's what I did.

I took some ribbon (from the by-the-yard-trim section in the fabric department), but you could use any kind of trim for this; lace, pom-pom, ric-rac, etc.

I cut it to fit around the front and back pockets. Pinned it in place, and then hand-sewed it in on the jeans.


And with the extra trim that I had, I slapped together some hair-flair. I just hand-stitched the ribbon into a flower shape. Then just glued it to an elastic headband.

Nice, and totally adorable!
Thanks for checking it out!

Thursday, February 23, 2012

No-sew sequin hair clips

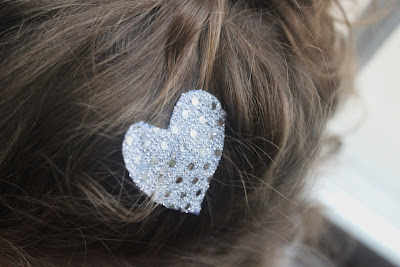
Here's an easy, no-sew hair clip I made for Ry-pie. All you have to do is cut and glue. So simple - because simple, is about all I can manage these days. ;)


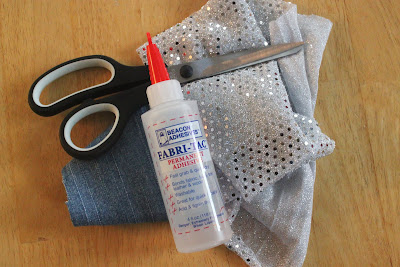
Supplies:
Scissors
Fabric glue
Heavy weight material for backing (I used denim)
Sequin fabric in your choice of color


First, I drew and cut out my shapes onto some paper. I used a water-soluble marker to trace my shapes onto my denim fabric. Then, I cut them out.


I traced the shapes onto my sequin fabric, and cut those out too.


I applied a thin layer of glue to my denim material, then placed the sequin fabric on top. (Sequin side facing up.)


Trim any excess fabric...


...so fabric shapes are even.


Finish it off by gluing the back to any hair clip, and you're done!


Sweet and easy. Just how I like it.
:)

Thursday, January 12, 2012

Crinkle Sensory Toy

Our little miss Shelb's has been fascinated with the wrappers that hold baby wipes. I guess it's the sound she likes? Anyways, I figured it would be pretty easy to put together a more "baby-friendly" sensory toy for her. Using the wipe wrapper of course!


The best part is, you can totally use scraps, and make it any size you want! I even added some ribbon detail, kinda like the ones on those little Taggie blankets.

What you need:
2 pieces of material
An empty baby wipes refill
Some ribbon
Sewing machine, and thread


I cut out my scrap pieces to measure 5x10". The ribbon measured anywhere from 3-6". I cut several pieces of ribbon, but in the end, only used four pieces.


Place your fabric pieces right side together. Take your ribbon piece and fold in half. Insert the ribbon, folded edge first, so it's "sandwiched" between your fabric. Pin in place.


Sew all the way around, making sure you leave a two inch opening on one end. Backstitch at the beginning and the end.

Trim around the edges, clipping the angles off the corners, but be careful not to cut through your stitching. Turn right-side out.


This is what it will look like when you turn it. Don't be like me, iron your creation. ;)


Cut your wrapper to fit inside of your fabric. Stuff the wrapper in, through the 2" opening you left un-sewn.


Topstitch around the entire rectangle, making sure that the open part gets sewn shut.

There you have it! A simple little crinkle toy to keep your little one entertained!


Related Posts Plugin for WordPress, Blogger...